 Skip to content
 ArangoDB’s GraphRAG Transforms Healthcare Data Management
Estimated reading time: 7 minutes
Healthcare Data Challenges
Healthcare organizations across the spectrum—from large hospital systems to payers to individual providers—face unprecedented IT challenges. These include siloed information systems, complex regulatory requirements, and rapidly evolving clinical research. Add fast-growing patient expectations for personalized care, and one can relate to how challenging all this is. Traditional databases or data lakes have rigid schemas and limited modeling capabilities. They often fail to address these complex needs.
ArangoDB offers a fundamentally different approach through its native multi-model architecture that combines document, graph, and key-value models in a single database. In healthcare, we have diverse data types and complex relationships between entities (patients, providers, treatments, outcomes). ArangoDB addresses the complicated requirements in healthcare organizations, combining document, graph, and key-value models.
ArangoDB's capabilities have transformed how heterogeneous healthcare data is managed. Its flagship graph database boasts flexibility, performance, and integration capabilities. Experts say that the combination of schema-free design, SmartGraphs technology, and GraphRAG empowers healthcare data stakeholders such as doctors, insurance companies, caregivers, and regulators, among others. They are able to create comprehensive patient views, make data-driven decisions, and deploy AI-enhanced solutions. This is achieved by ArangoDB's GraphRAG while maintaining compliance and reducing costs.
The healthcare industry produces heterogeneous data streams in zettabytes (1000s of Exabytes). Based on the most recent industry reports and statistics available, the healthcare industry generated approximately 2,750 exabytes (2.75 zettabytes) of data in 2024. This information must then be integrated, analyzed and sent to various stakeholders such as clinics, pharma companies, and tech vendors. ArangoDB's flexible, schema-free design enables this integration while its graph capabilities reveal valuable relationships that impact care quality and operational efficiency.
Core Technologies Addressing Healthcare Needs
ArangoDB's core technologies provide specific advantages for healthcare applications. Firstly, a native multi-model database, which combines document, graph, and key-value models in a single database. The goal is to reduce complexity and cost while improving data integration.
For example, the ArangoDB Data Science Suite includes a Graph Analytics Engine (GAE) for high-performance graph computations, enabling complex healthcare analytics at scale. GraphRAG Technology combines knowledge graphs with large language models (LLMs) to enable more accurate, contextual information retrieval and generation.
In the area of Enterprise Security Features, ArangoDB provides comprehensive authentication, authorization, encryption, auditing, and data masking capabilities essential for healthcare compliance.
Solutions for healthcare stakeholders
Payers
Health insurance companies face unique challenges in the important areas of managing claims, assessing risk, and detecting fraud. They're also looking to optimize costs while ensuring member satisfaction. These payers can now enhance efficiency and member experience using ArangoDB. How do they accomplish this?
Firstly, payers can develop comprehensive member profiles. ArangoDB's schema-free design enables payers to create 360-degree member profiles by integrating claims history, provider interactions, wellness program participation, and communication preferences without rigid schema constraints. As healthcare data requirements evolve with new regulations and capabilities, ArangoDB adapts without disruptive database redesigns.
What about fraud detection? Graph databases are particularly effective for detecting potentially fraudulent claims by revealing otherwise hidden or suspicious patterns and relationships. ArangoDB outperforms traditional databases in revealing these connections, with benchmark results showing up to 8x faster performance than competing graph databases.
One additional way in which payers can enhance efficiencies and member experiences is through network optimization and risk assessment. SmartGraphs technology enables payers to model provider networks as graphs. The provider network models are then optimized for coverage, accessibility, and performance. Payers can identify high-performing providers by analyzing referral patterns and outcomes across large populations. They could use this analysis to create more accurate risk assessments.
Providers
For providers and hospitals, they are most interested in improving care delivery and operations. Providers need solutions that improve care coordination and enhance operational efficiency. In today's healthcare businesses, supporting clinical decision-making has become a priority to improve efficiencies and cut costs. ArangoDB offers several key capabilities to providers and hospitals.
Let's consider unified patient records, which are typically found in systems such as Epic. Improved clinical decision-making and care coordination are an ongoing need. ArangoDB's multi-model approach allows providers to integrate diverse data types—electronic medical records, lab results, imaging studies, and external health information—into comprehensive patient views. This 360-degree perspective supports better clinical decision-making and care coordination.
If you want enhanced clinical decision support, this is the right solution. GraphRAG greatly enhances clinical decision support. This is achieved by providing contextually relevant information at the point of care. As demonstrated in the Decoded Health case study, this approach enabled doctors to serve four times more patients (from 2,000 to 8,000) by streamlining patient conversations and surfacing situationally appropriate information.
Graphs help optimize providers' operations. Let's discuss how. Hospitals, private practices, and clinics could leverage ArangoDB's graph capabilities. Firstly, they could model workflows as well as patient journeys. We can model even resource utilization. This modeling helps identify bottlenecks and inefficiencies, optimize staffing, and improve resource allocation. The SmartGraphs technology enables these complex analyses to run efficiently across large, distributed datasets.
Doctors and Private Practices
For doctors and private practices, streamlining workflows and enhancing care is critical. Physicians and smaller practices need solutions that enhance clinical effectiveness without adding administrative burden. ArangoDB provides several important advantages in this context.
What about streamlined workflow integration? ArangoDB simplifies the integration of practice management systems, EHRs, and external data sources. In the past, this required complex integration projects. The schema-free design accommodates diverse data formats and structures. AQL (ArangoDB Query Language) efficiently retrieves and analyzes patient information.
Physicians look for enhanced clinical insight at the point of care. ArangoDB GraphRAG technology allows physicians to search for comprehensive patient information and context-sensitive medical knowledge across systems. They don't need to learn a complex query language. Clinicians can now use queries in English or in another natural language. This user interface, compared to using a complicated query language against a rigid schema, slashes the amount of time that clinicians currently spend searching for information. Physicians can thus make faster, more informed clinical decisions.
With large practices, practice management is time-consuming and complicated. ArangoDB's versioning capabilities maintain comprehensive audit trails essential for compliance with healthcare regulations. The enterprise features ensure HIPAA compliance through authentication, authorization, encryption, and auditing capabilities.
Patients
What about patients? How can this technology help them? Modern patients demand personalized care and engagement. They seek out transparent care experiences.
By creating unified views of each patient's health data across providers and time, ArangoDB enables truly personalized care plans and recommendations. The time-based knowledge graph capability allows for understanding a patient's health journey over time.
A clinician can use a conversational interface to ask questions about patient history and the specific context of the health issue. These interfaces, when combined with GraphRAG, can translate complex medical information into understandable language and provide personalized explanations based on the patient's specific conditions.
For data transparency and privacy, you need trusted audit trails. ArangoDB's audit trails lead to data clarity and help regulators and patients. Patients can confidently access their complete health records online, knowing that their information is secure and used appropriately.
SmartGraphs: Enabling High-Performance Distributed Healthcare Analytics
SmartGraphs enables high-performance distributed healthcare Analytics. As healthcare data volumes grow to zettabytes, we need to distribute data efficiently. ArangoDB's SmartGraphs technology gives improved performance to several clients. But how exactly is this accomplished?
SmartGraphs automatically distribute healthcare data across many hardware servers based on natural relationships. This keeps related patient data co-located with each other. Why? We want to minimize any unnecessary network communication. Healthcare payers and providers scale horizontally while maintaining outstanding performance for complex queries.
For example, by reducing network hops during complex patient data queries, SmartGraphs achieve 40-120x performance gains over regular sharded graphs. This optimization enables real-time analysis of comprehensive patient information, even across large, distributed datasets.
SmartGraphs use the "smartGraphAttribute" property to optimize data distribution. In healthcare, this might be patient ID, geographic region, or care provider, ensuring that highly connected communities of data remain on the same database server. We improve query performance by 4000% - 12000% when analyzing patient journeys, care pathways, or provider networks.
Real-Time Data Enrichment with AQL
What about real-time data enrichment? Can AQL help here?
Healthcare decision-making requires up-to-date, comprehensive information. ArangoDB's query language (AQL) enables powerful data operations essential for healthcare applications.
As we've discussed earlier, AQL can query document, graph, and key-value data through a SQL-like language. This unified approach enables complex traversals across patient journeys and care networks in the graph. You can also do sophisticated analytics on healthcare data across data types.
AQL supports comprehensive data modification operations (INSERT, UPDATE, REPLACE, REMOVE, UPSERT) for real-time data assimilation and analysis. You can update patient profiles with the latest clinical findings and interactions in real-time.
Implementation Example
The Decoded Health case study on ArangoDB’s website discusses how AQL's functionality for timestamp-based queries helps a clinician view a patient's condition at any historical point. This capability allows doctors to complete patient encounters faster and better understand medical conditions and treatments over time.
Healthcare operations require comprehensive record-keeping, such as data versions and audits for both clinical and compliance purposes. ArangoDB provides robust capabilities in this area.
ArangoDB can maintain complete histories of patient data modifications, supporting point-in-time analysis of clinical information and enabling temporal queries for understanding health trends and treatment effectiveness.
The solution records all data access and modifications with user attribution, supporting HIPAA and other compliance needs. This auditing capability verifies data integrity and appropriate access, essential for healthcare compliance.
As shown in the Decoded Health case study at ArangoDB’s website, we can put together a time-based knowledge graph. Here, each node and edge would include a timestamp for creation and expiration. Healthcare providers can now "travel" to any point in time to see a patient's condition and care history. Why is this important? For understanding disease progression and treatment effectiveness, this is critical.
GraphRAG: Context-Aware Natural Language Interface for Healthcare
What is GraphRAG? It's a context-aware natural language interface. We need intuitive, intelligent interfaces for accessing complex medical information. ArangoDB's GraphRAG delivers advanced capabilities in this context.
GraphRAG combines the strengths of knowledge graphs with large language models to retrieve precisely relevant medical information based on context and relationships. This approach reduces AI hallucinations by grounding responses in verified clinical knowledge.
GraphRAG enables healthcare organizations to deploy chatbot-style interfaces that understand clinical terminology and context. These interfaces allow natural language queries against comprehensive patient and medical knowledge, providing contextually appropriate responses based on user role and information needs.
GraphRAG implements a hierarchical approach to organizing medical information. Semantic clusters and a graph structure are the approach used. This improves transparency and interpretability by enabling tracing of sources for AI-generated responses. How does this help? By making it easier for medical professionals to verify outputs.
Implementation Considerations and Challenges
While the benefits of ArangoDB in healthcare are substantial, organizations should be aware of several implementation considerations with GraphRAG.
Firstly, examine your data integration strategy. Healthcare organizations should identify priority data sources for initial integration, define entity resolution approaches for connecting records across systems, and establish data governance practices for maintaining high-quality information.
Next, consider technical challenges such as indexing, query optimization, and performance. You should consider how to index large datasets, how to optimize queries for multi-hop questions, and how to balance performance with comprehensive data analysis when you implement ArangoDB GraphRAG.
Finally, organizations should leverage ArangoDB's HIPAA-compliant features, implement appropriate authentication, authorization, and audit controls, and utilize data masking for non-production environments.
ArangoDB's multi-model capability also reduces the total cost of ownership. Multiple database technologies are no longer needed. Real-world implementations have demonstrated a 25% reduction in cloud infrastructure costs through optimized resource utilization.
Conclusion
In conclusion, ArangoDB's GraphRAG offers a comprehensive solution that addresses the specific needs of each healthcare stakeholder. Payers gain enhanced fraud detection, comprehensive member profiles, and improved risk assessment capabilities. Providers and hospitals benefit from unified patient records, enhanced clinical decision support, and operational optimization. Doctors and private practices enjoy streamlined workflows, enhanced clinical insights, and expanded service capabilities without extensive IT infrastructure. And patients receive more personalized care, enhanced engagement, better health literacy, and greater transparency.
ArangoDB's schema-free design, real-time adaptability, SmartGraphs technology, powerful query language, comprehensive versioning, and advanced natural language capabilities, in addition to ArangoDB GraphRAG, combine to create a solution uniquely suited to healthcare's complex data challenges. As the industry continues to evolve toward more personalized, data-driven, and value-based care, ArangoDB provides the foundation for innovation and excellence across the healthcare ecosystem.
References
- https://arangodb.com/arangodb-for-healthcare/
- https://arangodb.com/solutions/case-studies/decoded-health-transforming-healthcare-with-ml-models-ontologies-and-graphs/
- https://arangodb.com/performance-at-scale/
- https://arangodb.com/native-multi-model-database-advantages/
- https://arangodb.com/2024/12/benchmark-results-arangodb-vs-neo4j-arangodb-up-to-8x-faster-than-neo4j/
- https://www.linkedin.com/pulse/role-graphrag-modern-healthcare-systems-anindita-santosa-5rqxc
- https://hipaa-software.com/arangodb/
- https://arangodb.com/2019/04/building-hipaa-compliant-applications-with-arangodb/
- https://arangodb.com/enterprise-server/smartgraphs/
- https://statusneo.com/arangodb-a-graph-database/
- https://docs.arangodb.com/3.13/aql/data-queries/
- https://www.linkedin.com/pulse/implementing-knowledge-graph-rag-clinical-decision-support-bhate-occze
- https://arangodb.com/2023/05/three-ways-to-scale-your-graph/
- https://gradientflow.com/graphrag-medgraphrag/
- https://orq.ai/blog/graphrag-advanced-data-retrieval-for-enhanced-insights
- https://www.ankursnewsletter.com/p/graph-rag-vs-traditional-rag-a-comparative
- https://arangodb.com/enterprise-server/data-masking/
- https://www.doit.com/clients/arangodb/
- https://arangodb.com/solutions/solutions-customers/
Benchmark Results – ArangoDB vs. Neo4j : ArangoDB up to 8x faster than Neo4j
Introduction
This document presents the benchmark results comparing the ArangoDB’s Graph Analytics Engine (GAE) against Neo4j. The GAE is just one component of ArangoDB’s Data Science Suite.
This reproducible benchmark aims to provide a neutral and thorough comparison between the two databases, ensuring a fair and unbiased assessment.
We use the wiki-Talk dataset, a widely used, real-world graph dataset derived from the edit and discussion history of Wikipedia.
The wiki-Talk dataset encapsulates communication patterns between Wikipedia users, specifically interactions on user talk pages. This dataset is used frequently in benchmarking graph databases and graph analytics systems because of its unique characteristics. The key characteristics of wiki-Talk that make it a highly reliable benchmarking dataset are: Directed Graph, Nodes and Edges, Scale, Temporal Dimension, Sparsity, etc.
The results demonstrate the efficiency and scalability of each database, and offer a representative benchmark model for organizations evaluating graph databases for their needs.
Benchmark Highlights
The benchmark results reveal several notable insights, particularly highlighting ArangoDB's superior performance in graph analytics tasks compared to Neo4j. Most strikingly:
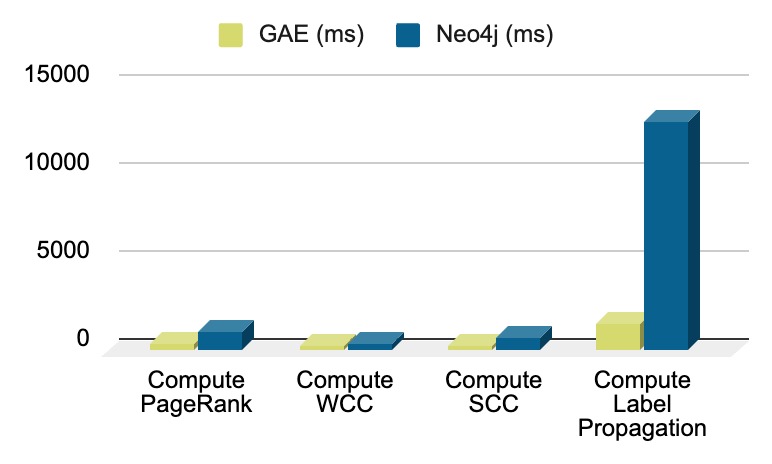
- ArangoDB consistently outperformed Neo4j across various graph computation algorithms, with performance improvements that range from 1.3 times to over 8 times faster.
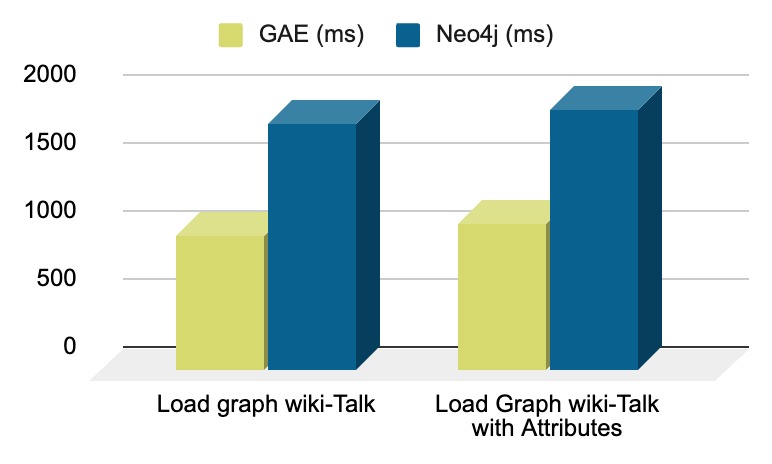
- This substantial speed advantage is also evident in graph loading times, where ArangoDB demonstrated an impressive 100% advantage in graph loading efficiency vs Neo4j, for the wiki-Talk dataset.
ArangoDB's optimized data storage and retrieval, combined with its advanced query execution and effective use of clustered deployments, also contributed significantly to its superior performance in these scenarios.
These findings underscore:
- ArangoDB's capability to handle much larger-scale and far faster real-time graph analytics applications.
- ArangoDB as a much more compelling choice for industries and organizations that require rapid data processing and analysis, such as real-time recommendation systems, social network analysis, fraud detection, and cyber security.
Benchmark Overview
Datasets (wiki-Talk)
We utilized the wiki-Talk dataset, a well-regarded dataset for evaluating graph database performance. The chosen graphs and their details are as follows:
| Graphs Used | Vertices | Edges |
|---|---|---|
| wiki-Talk | 2,394,385 | 5,021,410 |
Hardware
All tests were conducted on the same machine with the following specifications:
OS Ubuntu 23.10 (64-bit)
Memory 192 GB (4800 MHz)
CPU Ryzen 9 7950X3D (16 Cores, 32 Threads)
Database Configuration
***Neo4j***
Version 5.19.0 (Community Edition)
Deployment On-Premise, Single Process
***ArangoDB***
Version 3.12.0-NIGHTLY.20240305 (Community Edition)
Deployment On-Premise, Single Process
Graph Analytics Engine (GAE)
Version Latest
Deployment On-Premise, Single Process (RUST-based, no multithreading)
Benchmark Configuration
Two workflows were used to measure performance:
Workflow A:
- Create the in-memory representation
- Execute each algorithm once
- Measure the whole process
Workflow B
- Create the in-memory representation
- Measure graph creation time
- Execute each algorithm individually
- Measure computation time
Algorithms Tested
- Pagerank
- Weakly Connected Components (WCC)
- Strongly Connected Components (SCC)
- Label Propagation
Used Technologies
- JavaScript Framework: Vitest with tinybench
- Communication
- Neo4j: Official Neo4j JS driver ("neo4j-driver": "^5.18.0")
- GAE: Plain HTTPs requests using Axios ("axios": "^1.6.8")
Benchmark Results
Graph Loading (wiki-Talk)
| Task | GAE (sec) | Neo4j (sec) | Times Faster |
|---|---|---|---|
| Load graph wiki-Talk | 9.9 | 18 | 1.8 x |
| Load Graph wiki-Talk with Attributes | 10.7 | 19.2 | 1.8 x |
Graph Computation (wiki-Talk)
| Task | GAE (sec) | Neo4j (sec) | Times Faster |
|---|---|---|---|
| Compute PageRank | 3.8 | 10.6 | 2.8 x |
| Compute WCC | 2.3 | 4.5 | 1.7 x |
| Compute SCC | 3.2 | 6.7 | 2.1 x |
| Compute Label Propagation | 1.5 | 13 | 8.5 x |
Explanation of Elements
Graph Algorithms
- Pagerank, An algorithm that is used to rank nodes in a graph based on their connections, also commonly used in search engines.
- Weakly Connected Components (WCC), which identifies subsets of a graph where any two vertices are connected by paths, ignoring the direction of edges.
- Strongly Connected Components (SCC), Identifying subsets of a graph where every vertex is reachable from every other vertex within the same subset.
- Label Propagation, a semi-supervised learning algorithm for community detection in graphs, where nodes propagate their labels to their neighbors iteratively.
Reasons for ArangoDB’s Superior Performance
Several factors contribute to ArangoDB's superior performance:
The performance of ArangoDB on the Wiki-Talk dataset is attributed to specific architectural optimizations rather than on raw computational benchmarks. In this scenario, ArangoDB serves as a data storage system, while the computation is handled by the Graph Analytics Engine (GAE). The benchmark focuses on two key stages:
- Loading the data into the GAE
- Computation of algorithms within the GAE
Graph Loading Times
ArangoDB Side
ArangoDB’s graph loading times are optimized due to two primary factors:
- Parallel Data ExtractionArangoDB’s support for parallel data loading from both single and distributed systems is a big reason for data loading performance advantages. This capability lets teams scale to multiple machines, where increased parallelism gets you faster data transfer. By enabling efficient horizontal scaling, the system achieves significant performance improvements compared to approaches that are limited to sequential or that don’t leverage parallel extractions.
- Projections for Targeted Data TransferProjections allow ArangoDB to transmit only the data attributes required for analysis. So, if only edge IDs and a single attribute are needed, the system only extracts and transfers these fields, avoiding the overhead of transmitting entire documents. This reduces both the data volume and network latency during graph loading operations.
Graph Analytics Engine (GAE) Side
The GAE is built using RUST, and it processes the transferred data with high efficiency:
- Efficient Data Representation
The GAE stores graph data within highly optimized in-memory structures, reducing memory usage while at the same time maintaining extremely fast access speeds. Graphs are immediately ready for computation without unnecessary delays.
Advantages in the Workflow
These features deliver several tangible benefits, as shown during the benchmark:
- Fast and Parallel Data Extraction - Parallelism improves speed and scalability.
- Optimized Data Transfer with Projections - Only the required data is transmitted, minimizing overhead.
- Compact and Efficient In-Memory Representation in GA - High-performance graph computation with minimal memory footprint.
Clarifying the Benchmark Scope
It is important to note that the benchmark does not evaluate data insertion times into ArangoDB or computational tasks performed by ArangoDB itself. Instead, it assesses the efficiency of:
- Loading graph data from ArangoDB into the GAE.
- The GAE's ability to compute graph algorithms.
By highlighting these stages, the benchmark shows the advantages of ArangoDB’s design in supporting large-scale graph workflows through fast data loading and efficient interaction with the GAE.
Reproducibility of the Benchmark
This benchmark is 100% reproducible, ensuring consistent and verifiable results. These results reflect ArangoDB’s implementation per the precise specifications and configurations mentioned above. We welcome organizations to replicate the benchmark to ensure consistent results. To do this, follow these steps:
- First, set up the hardware environment with an Ubuntu 23.10 operating system, 192 GB of memory, and a Ryzen 9 7950X3D CPU.
- Install and configure the latest versions of Neo4j and ArangoDB using the provided Docker configurations. Use single-threaded (non-clustered) configurations for both.
- Next, utilize the wiki-Talk dataset for testing. Execute the specified graph algorithms (PageRank, WCC, SCC, Label Propagation) using the detailed workflows (A and B) outlined in the benchmark configuration above.
- Measure the in-memory graph creation and computation times, and compare the results for both databases. This method ensures that the benchmark can be reliably reproduced in different environments.
PLEASE NOTE: This benchmark requires the installation of the ArangoDB Graph Analytics Engine (GAE). As this code is not open source, please reach out to Corey Sommers at corey.sommers@arangodb.com to receive access to the GAE for the purposes of reproducing this benchmark in your environment (to ensure objectivity of results).
Conclusion
The benchmark results clearly demonstrate ArangoDB's far superior performance over Neo4j in the categories of graph computation and loading tasks. ArangoDB's significant speed advantages - particularly its ability to execute complex algorithms and load large datasets much faster - highlight its optimized architecture and efficient data handling.
These findings make ArangoDB a compelling choice for applications requiring high-performance graph analytics and real-time data processing.
Vector Search in ArangoDB: Practical Insights and Hands-On Examples
Vector search is gaining traction as a go-to tool for handling large, unstructured datasets like text, images, and audio. It works by comparing vector embeddings, numerical representations generated by machine learning models, to find items with similar properties. With the integration of Facebook’s FAISS library, ArangoDB brings scalable, high-performance vector search directly into its core, accessible via AQL (ArangoDB Query Language). Vector Search is now just another, fully-integrated data type/model in ArangoDB’s multi-model approach.
This guide will walk you through setting up vector search, combining it with graph traversal for advanced use cases, and using tools like LangChain to power natural language queries that integrate Vector Search and GraphRAG.
What is Vector Search and Why Does it Matter?
Vector search lets you find similar items in a dataset by comparing their embeddings. Embeddings are essentially compact numerical representations of data—like a fingerprint for each data point—that capture its essence in a way that machine learning models can process.
For instance:
- Text: An embedding might represent the meaning of a sentence.
- Images: An embedding might capture the general appearance of an object.
- Audio: An embedding might represent the rhythm or tone of a sound.
Traditional search methods like keyword matching or exact lookups can’t handle the subtle relationships captured by embeddings. Vector search fills that gap, finding semantically similar results even if the original data is complex or unstructured.
Setting Up Vector Search in ArangoDB
To get started, you need to create a vector index, which makes searching embeddings fast and efficient.
Step 1: Create a Vector Index in AQL
Imagine you have a collection called items where each document includes a vector embedding stored in the attribute vector_data. To set up an index using arangosh:
>>> db.items.ensureIndex(
{
name: “vector_cosine”
type: “vector”
fields: [“vector_data”]
params: { metric: “cosine”, dimension: 128, nLists: 100 }
}
Explanation:
- type: "vector" specifies this is a vector index.
- dimension: 128 indicates the size of the embeddings
- metric: "cosine" defines the similarity measurement (another can be l2).
- nLists: 100 defines the number of clusters used in the index
This step prepares the collection for efficient similarity searches.
Step 2: Perform a Vector Search
Now, let’s query the items collection to find the five most similar embeddings to a query vector
[0.1, 0.3, 0.5, ...]:

LET query = [0.1, 0.3, 0.5, ...]
FOR doc IN items
LET score = APPROX_NEAR_COSINE(doc.vector_data, query)
SORT score DESC
LIMIT 5

RETURN {doc, score}
Explanation:
- SCORE: The cosine distance between the query vector and the document’s as a number between 0 and 1. The closer the score is to 1, the closer the query vector is to the document.
- APPROX_NEAR_COSINE: Compares the vector_data attribute of each document with the query vector using Approximate Nearest Neighbor search via Cosine distance.
- SORT: Orders the results by similarity score, descending.
- LIMIT: Restricts the results to the top 5 matches.
Combining Vector Search with Graph Traversals
One of ArangoDB’s strengths is its multi-model capability, which allows you to combine vector search with graph traversal. For example, in a fraud detection scenario, you might:
- Use vector search to find similar case descriptions.
- Traverse the graph to uncover related entities (e.g., linked transactions or individuals).
Example: Vector Search + Graph Traversal
LET query = [0.1, 0.3, 0.5, ...]
FOR doc IN items
LET score = APPROX_NEAR_COSINE(doc.vector_data, query)
SORT score DESC
LIMIT 5
LET related_nodes = (
FOR v, e, p IN 1..2 ANY doc GRAPH 'fraud_graph'
RETURN v
)

RETURN {doc, score, related_nodes}
Explanation:
- The first query finds documents similar to the query vector (just like the example above).
- The LET sub-query performs a graph traversal on the results, fetching nodes related to each document.
- The final RETURN combines the document, similarity score, and its related graph data.
GraphRAG: Combining Vector Search and Knowledge Graphs
GraphRAG (Graph-based Retrieval-Augmented Generation) combines vector search with knowledge graphs to enhance natural language query handling. It retrieves both semantically similar results (using vector embeddings) and highly structured insights (via graph traversal), making it ideal for use cases like law enforcement, fraud detection, and advanced recommendation systems.
How to Implement GraphRAG with ArangoDB
- Store Embeddings and Relationships
- Store vector embeddings in Document Collections (either Vertices or Edges).
- Organize Entities and their Relationships in the Graph.
- Set Up Query Pipeline
- Use Vector Search to find semantically similar items.
- Traverse the Graph to uncover related Entities and Relationships.
- Combine with an LLM (Large Language Model)
- Use the results to provide context for an LLM, enabling more accurate and context-aware responses.
Natural Language Querying with LangChain
To allow users to query using natural language, you can integrate LangChain with ArangoDB. LangChain converts a user’s natural language input into structured AQL queries. Here’s how you might implement this:
Step 1: Define the Workflow
- User inputs a query like: "Find cases similar to Cybercrime A1425 and show related transactions."
- LangChain processes the query to understand its intent and structure.
- The tool generates an AQL query combining vector search and graph traversal.
Step 2: Example LangChain Integration
from arango import ArangoClient
from langchain_openai import ChatOpenAI
from langchain_community.graphs import ArangoGraph
from langchain_community.chains.graph_qa.arangodb import ArangoGraphQAChain

# Initialize ArangoDB connection
client = ArangoClient("http://localhost:8529")
db = client.db(username=”root”, password=”test”)

# Select the LLM of choice
llm = ChatOpenAI(temperature=0, model_name="gpt-4")

# Define the natural language interface chain
chain = ArangoGraphQAChain.from_llm(
llm=llm, graph=ArangoGraph(self.db)
)

# Invoke the chain interface
response = chain.invoke(“find cases similar to Cybercrime A1425 & their related transactions”)
print(response)
Explanation:
- LangChain generates the AQL query based on the user’s input.
- The generated query could combine vector search and graph traversal, as shown earlier.
- The result is sent back to the user as structured insights.
Why Combine Vector Search with Graph?
By pairing vector search with graph traversal, you get the best of both worlds:
- Vector Search: Excels at retrieving semantically similar, unstructured data.
- Graph Traversal: Shines when exploring structured relationships.
For instance:
- In fraud detection, vector search finds similar cases, while graph traversal uncovers linked transactions and actors.
- In law enforcement, vector search identifies relevant documents, and graph traversal maps connections between suspects.
HybridGraphRAG: Combining Vector Search with Graph Traversals and Full-Text Search
HybridGraphRAG extends the power of ArangoDB by combining three advanced retrieval mechanisms: vector search, graph traversal, and full-text search. This hybrid approach ensures you can handle complex, multi-dimensional queries that involve both semantic similarity and structured data relationships.
Why Use HybridGraphRAG?
When combining these technologies, you can:
- Retrieve semantically similar documents using vector search.
- Explore relationships between entities through graph traversal.
- Match specific keywords or phrases using full-text search.
This approach is ideal for applications like fraud detection, law enforcement, or personalized recommendation systems where structured and unstructured data complement each other.
How to Implement HybridGraphRAG in AQL
Let’s walk through an example where you:
- Use full-text search to find documents mentioning "cybercrime” and “threat”.
- Use vector search to retrieve documents similar to the query embedding.
- Use graph traversals to find relationships between the retrieved documents.
Combined Query Example:
LET query = [0.1, 0.3, 0.5, ...]
LET text_matches = (

FOR doc IN itemsView
SEARCH PHRASE(doc.text, [“cybercrime”, “threat”], “text_en”)
RETURN doc._id
)

FOR doc IN items
FILTER doc._id IN text_matches
LET score = APPROX_NEAR_COSINE(doc.vector_data, query)
SORT score DESC
LIMIT 5
LET related_nodes = (
FOR v, e, p IN 1..2 ANY doc GRAPH 'fraud_graph'
RETURN v
)

RETURN {doc, score, related_nodes}
Explanation:
- itemsView: An ArangoDB View representing the inverted index of doc.text.
- SEARCH PHRASE(...): Matches documents with the keyword “cybercrime”.
- APPROX_NEAR_COSINE: Compares each doc.vector_data with the query vector using Approximate Nearest Neighbor search via Cosine distance.
- LET related_nodes: Fetches the 1-to-2-hop neighborhood of the matching documents.
Conclusion
ArangoDB’s vector search, powered by FAISS, is more than a standalone feature—it’s a force multiplier for combining advanced data science techniques with graph-based insights. Whether you’re implementing natural language interfaces with LangChain or building hybrid query pipelines for real-world problems, the integration of vector search into ArangoDB’s multi-model system opens up endless possibilities.
Get started by creating your vector index, crafting AQL queries, and exploring what’s possible when you blend vectors with graphs. The tools are ready—now it’s up to you to build something amazing.
Some Perspectives on HybridRAG in an ArangoDB World
Estimated reading time: 7 minutes
Introduction
Graph databases continue to gain momentum, thanks to their knack for handling intricate relationships and context. Developers and tech leaders are seeing the potential of pairing them with the creative strength of large language models (LLMs). This combination is opening the door to more precise, context-aware answers to natural language prompts. That’s where RAG comes in—it pulls in useful information, whether from raw text (VectorRAG) or a structured knowledge graph (GraphRAG), and feeds it into the LLM. The result? Smarter, more relevant responses that are grounded in actual data.
(more…)ArangoDB 3.12 – Performance for all Your Data Models
Estimated reading time: 6 minutes
We are proud to announce the GA release of ArangoDB 3.12!
Congrats to the team and community for the latest ArangoDB release 3.12! ArangoDB 3.12 is focused on greatly improving performance and observability both for the core database and our search offering. In this blog post, we will go through some of the most important changes to ArangoDB and give you an idea of how this can be utilized in your products.
(more…)The world is a graph: How Fix reimagines cloud security using a graph in ArangoDB
'Guest Blog'
Estimated reading time: 5 minutes
In 2015, John Lambers, a Corporate Vice President and Security Fellow at Microsoft wrote “Defenders think in lists. Attackers think in graphs. As long as this is true, attackers win.ˮ
The original problem in cloud security is visibility into my assets. If security engineers donʼt know what cloud services are running, they canʼt protect an environment. Unfortunately, first generation cloud security products were built with a list mindset, i.e. “rows and columnsˮ. They generate a list of assets and their configurations – but show no context of the relationships between connected cloud services, such as as a connection that would allow lateral movement between two disparate cloud assets.
Cloud security as a graph
A graph database like ArangoDB provides a powerful way to represent and analyze complex relationships in cloud security.
A graph is the easiest way to understand how one entity in my cloud interacts with another. By representing cloud assets as nodes in a graph and the relationships between them as vertices, I can now gain a better understanding of the nested connections in my cloud infrastructure.
By thinking about cloud resources in terms of ancestors and descendants, a cloud security engineer can solve problems in a way a table canʼt. The graph is an easier way to visualize the relationships between users and any of my cloud resources such as compute instances, functions, storage buckets and databases.
- Ancestors: The graph helps me understand the root of a security issue. What is the highest ancestor where an issue was introduced? Because I need to go all the way up and fix the problem at its origin.
- Descendants: The other way around is understanding descendants and blast radius. If I have an Internet-exposed compute instance, where an attacker is maybe able to get credentials off that instance, how many hops can that attacker go in? How much of my infrastructure is exposed due to this initial compromise?
In a cloud-native world, these graph traversal capabilities are fundamental for cloud security. Going forward, any operating model for cloud security should be built on a graph. With Fix, weʼre building such a modern cloud security tool, and weʼre building it with ArangoDB.
But first, a list!
Now that we covered the benefits of using a graph for cloud security, letʼs start with a list. Yes, a list – because sometimes, viewing my cloud assets in a graph might not be the most intuitive or useful thing.
For example, I may just want a list of my compute instance inventory across my AWS accounts. As a cloud security engineer, I want a baseline inventory of resources. I don’t really need a picture for that, I just want the list. And maybe I want to download it in a spreadsheet so I can slice and dice it, with metadata for each particular instance like create date, number of vCPUs and memory. A list is the best way to represent that information.
But if a list is enough, why collect data in a graph in the first place?
Because transformation from a graph to a table is trivial. The other way around, not so much. The graph lets you express things in a way that if you had the same data in a flat table, it would become intractable, with many different tables, foreign key relationships, and creating all kinds of joints all over the place. It just becomes too difficult to reason about.
The hard part is collecting data from cloud APIs and putting it into a graph form. Thatʼs much harder, takes time and is easy to get wrong. There are enough opportunities to make mistakes along the way, and create a representation thatʼs not correct or has bugs. Thatʼs why we believe transparency in how a cloud security product collects data matters. Both ArangoDB and Fix are open source. Our code shows how we collect and store data from cloud APIs in ArangoDB.
Graph-based analysis of cloud resources
The analysis layer of a graph is powerful because it can provide insights that tables cannot. One recent trend in security is that software engineers also take on security engineering tasks. They look after the security of their infrastructure, beyond infrastructure-as-code templates.
While Fix offers out-of-the-box visualizations and pre-built checks of compliance rules, weʼve also built a search syntax on top of the ArangoDB Query Language (AQL). With ArangoDB and AQL, I can store and query rich nested JSON-like document together with their vertices. Itʼs also easier to add and query metadata to the vertices – such as configuration data for a cloud resource. By building our syntax on top of AQL, weʼve made Fix human-friendly. Developers can easily run ad-hoc checks of the security posture of their infrastructure.
For example, activating flow logs in your VPCs is considered a security best practice by AWS. The search below finds all AWS VPCs where flow flogs are deactivated.
is(aws_vpc) with(empty, --> is(aws_ec2_flow_log))
Breaking it down, the search:
- first, finds all resources of the kind “aws_vpcˮ, no matter in which account or region they may run.
- then, filters for the VPCs without a direct relationship (successor) to an “aws_ec2_flow_logˮ resource.
A simple one line statement.
The same query expressed in SQL would require joining different tables with nested select statements, multiple where-clauses and case statements. It would be dozens of lines long and require an engineer to have knowledge of the table architecture and column names.
The power of a graph is that it lets you explore many-to-many relationships in a very easy way, in a way that a traditional row-based database just canʼt. By making security data from cloud resources available in a graph, software engineers with security responsibilities can gain visibility into the environment and reduce risks.
A graph provides context, context is king
The partnership between Fix and the ArangoDB team has brought our customers new security insights only made possible by the multi-dimensional relations of cloud resources stored in a graph. With ArangoDB, using graphs is no longer a complex computer science and operational challenge. For Fix, ArangoDB provides a graph database as a building block that makes it easy to store and query the relationships in your data.
Fix uses ArangoDB to analyze billions of relationships – in every cloud. With ArangoDB, weʼve been able to build a system that can ingest data at scale. One of our retail users ingests data from tens of thousands of cloud accounts in minutes, and then runs any type of analytics in a fraction of a second. The context of the graph helps security engineers to precisely answer questions and identify, prioritize and remediate risks – the “trifectaˮ of cloud security.
The precision, speed, and explainability of finding risks to your business is simply not possible without using a graph. When defenders can think in graphs, attackers lose.
Reintroducing the ArangoDB-RDF Adapter
Introducing ArangoDB’s Data Loader : Revolutionizing Your Data Migration Experience
Estimated reading time: 7 minutes
At ArangoDB, our commitment to empowering companies, developers, and data enthusiasts with cutting edge tools and resources remains unwavering. Today, we’re thrilled to unveil our latest innovation, the Data Loader, a game-changing feature designed to simplify and streamline the migration of relational databases to ArangoGraph. Let’s dive into what makes Data Loader a must-have tool for your data migration needs.
(more…)
Introducing the ArangoDB-PyG Adapter
Estimated reading time: 10 minutes
We are proud to announce the GA 1.0 release of the ArangoDB-PyG Adapter!
The ArangoDB-PyG Adapter exports Graphs from ArangoDB, the multi-model database for graph & beyond, into PyTorch Geometric (PyG), a PyTorch-based Graph Neural Network library, and vice-versa.
On July 29 2022, we introduced the first release of the PyTorch Geometric Adapter to the ArangoML community. We are proud to have PyG as the fourth member of our ArangoDB Adapter Family. You can expect the same developer-friendly adapter options and a helpful getting-started guide via Jupyter Notebook, and stay tuned for an upcoming Lunch & Learn session!
This blog post will serve as a walkthrough of the ArangoDB-PyG Adapter, via its official Jupyter Notebook.
(more…)
Integrate ArangoDB with PyTorch Geometric to Build Recommendation Systems
Estimated reading time: 20 minutes
In this blog post, we will build a complete movie recommendation application using ArangoDB and PyTorch Geometric. We will tackle the challenge of building a movie recommendation application by transforming it into the task of link prediction. Our goal is to predict missing links between a user and the movies they have not watched yet.
(more…)