 Skip to content
 ArangoDB | RocksDB Integration: Performance Enhancement
I have varying levels of familiarity with Google’s original leveldb and three of its derivatives. RocksDB is one of the three. In each of the four leveldb offerings, the code is optimized for a given environment. Google’s leveldb is optimized for a cell phone, which has much more limited resources than a server. RocksDB is optimized for flash arrays on a large servers (per various Rocksdb wiki pages). Note that a flash array is a device of much higher throughput than a SATA or SSD drive or array. It is a device that sits on the processor’s bus. RocksDB’s performance benchmark page details a server with 24 logical CPU cores, 144GB ram, and two FusionIO flash PCI devices. Each FusionIO device cost about $10,000 at the time of the post. So RocksDB is naturally tuned for extremely fast and expensive systems. Here is an example Arangodb import on a machine similar to the RocksDB performance tester: Read more
ArangoDB | Introduction to Fuerte: ArangoDB C++ Driver
In this post, we will introduce you to our new ArangoDB C++ diver fuerte. fuerte allows you to communicate via HTTP and VST with ArangoDB instances. You will learn how to create collections, insert documents, retrieve documents, write AQL Queries and how to use the asynchronous API of the driver.
Requirements (Running the sample)
Please download and inspect the sample described in this post. The sample consists of a C++ – Example Source Code – File and a CMakeLists.txt. You need to install the fuerte diver, which can be found on github, into your system before compiling the sample. Please follow the instructions provided in the drivers README.md. Read More
ArangoDB 3.3 Beta Release – New Features and Enhancements
It is all about improving replication. ArangoDB 3.3 comes with two new exciting features: data-center to data-center replication for clusters and a much improved active-passive mode for single-servers. ArangoDB 3.3 focuses on replications and improvements in this area and provides a much better user-experience when setting up a resilient single-servers with automatic failover.
This beta release is feature complete and contains stability improvements with regards to the recent milestone 1 and 2 of ArangoDB 3.3. However, it is not meant for production use, yet. We will provide ArangoDB 3.3 GA after extensive internal and external testing of this beta release. Read More
ArangoDB | Infocamere Investigation: Graph Databases Case Study
InfoCamere is the IT company of the Italian Chambers of Commerce. By devising and developing up-to-date and innovative IT solutions and services, it connects the Chambers of Commerce and their databases through a network that is also accessible to the public via the Internet. Thanks to InfoCamere, businesses, Public Authorities, trade associations, professional bodies and simple citizens – both in Italy and abroad – can easily access updated and official information and economic data on all businesses registered and operating in Italy.
The Italian Chambers of Commerce are public bodies entrusted to serve and promote Italian businesses through over 300 branch offices located throughout the country. InfoCamere helps them in pursuing their goals in the interest of the business community. On behalf of the Chambers’ System, InfoCamere plays a key-role in implementing the Italian Digital Agenda with respect to the digital transformation process of the national productive system, especially focusing on supporting the digitalization of SMEs.
Guest post by Luca Sinico (Software Developer, InfoCamere)
Performance analysis with pyArango: Part III Measuring possible capacity with usage Scenarios
ArangoDB | Milestone2: ArangoDB 3.3 New Data Replication
We’re pleased to announce the availability of the Milestone 2 of ArangoDB 3.3. There are a number of improvements, please consult the changelog for a complete overview of changes.
This milestone release contains our new and improved data replication engine. The replication engine is at the core of every distributed ArangoDB setup: whether it is a typical master/slave setup between multiple single servers or a full-fledged cluster. During the last month we:
- redesigned the replication protocol to be more reliable
- refactored and modernized the internal infrastructure to better support continuous asynchronous replication
- added a new global asynchronous replication API, to allow you to automatically and continuously mirror an entire ArangoDB single-instance (master) onto another one (or more)
- added support for automatic failover from a master server to one of his replica-slaves, if the master server becomes unreachable
Milestone 1 ArangoDB 3.3: Datacenter to Datacenter Replication
Every company needs a disaster recovery plan for all important systems. This is true from small units like single processes running in some container to the largest distributed architectures. For databases in particular this usually involves a mixture of fault-tolerance, redundancy, regular backups and emergency plans. The larger a data store, the more difficult is it to come up with a good strategy.
Therefore, it is desirable to be able to run a distributed database in one datacenter and replicate all transactions to another datacenter in some way. Often, transaction logs are shipped over the network to replicate everything in another, identical system in the other datacenter. Some distributed data stores have built-in support for multiple datacenter awareness and can replicate between datacenters in a fully automatic fashion.
This post gives an overview over the first evolutionary step of ArangoDB towards multi-datacenter support, which is asynchronous datacenter to datacenter replication.
Setting up Datacenter to Datacenter Replication in ArangoDB
Please note that this tutorial is valid for the ArangoDB 3.3 milestone 1 version of DC to DC replication!
Interested in trying out ArangoDB? Fire up your cluster in just a few clicks with ArangoDB ArangoGraph: the Cloud Service for ArangoDB. Start your free 14-day trial here
This milestone release contains data-center to data-center replication as an enterprise feature. This is a preview of the upcoming 3.3 release and is not considered production-ready.
In order to prepare for a major disaster, you can setup a backup data center that will take over operations if the primary data center goes down. For a server failure, the resilience features of ArangoDB can be used. Data center to data center is used to handle the failure of a complete data center.
Data is transported between data-centers using a message queue. The current implementation uses Apache Kafka as message queue. Apache Kafka is a commonly used open source message queue which is capable of handling multiple data-centers. However, the ArangoDB replication is not tied to Apache Kafka. We plan to support different message queues systems in the future.
The following contains a high-level description how to setup data-center to data-center replication. Detailed instructions for specific operating systems will follow shortly. Read more
Auto-Generate GraphQL for ArangoDB
Currently, querying ArangoDB with GraphQL requires building a GraphQL.js schema. This is tedious and the resulting JavaScript schema file can be long and bulky. Here we will demonstrate a short proof of concept that reduces the user related part to only defining the GraphQL IDL file and simple AQL queries.
The Apollo GraphQL project built a library that takes a GraphQL IDL and resolver functions to build a GraphQL.js schema. Resolve functions are called by GraphQL to get the actual data from the database. I modified the library in the way that before the resolvers are added, I read the IDL AST and create resolver functions.
To simplify things and to not depend on special "magic", let's introduce the directive `@aql`. With this directive, it's possible to write an AQL query that gets the needed data. With the bind parameter `@current` it is possible to access the current parent object to do JOINs or related operations.
Interested in trying out ArangoDB? Fire up your database in just a few clicks with ArangoDB ArangoGraph: the Cloud Service for ArangoDB. Start your free 14-day trial here.
A GraphQL IDL
type BlogEntry {
  _key: String!
  authorKey: String!

  author: Author @aql(exec: "FOR author IN Author FILTER author._key == @current.authorKey RETURN author")
}

type Author {
  _key: String!
  name: String
}

type Query {
  blogEntry(_key: String!): BlogEntry
}
This IDL describes a `BlogEntry` and an `Author` object. The `BlogEntry` holds an `Author` object which is fetched via the AQL query in the directive `@aql`. The type Query defines a query that fetches one `BlogEntry`.
Now let's have a look at a GraphQL query:
{
  blogEntry(_key: "1") {
    _key
    authorKey
    author {
      name
    }
  }
}
This query fetches the `BlogEntry` with `_key` "1". The generated AQL query is:
FOR doc IN BlogEntry FILTER doc._key == '1' RETURN docAnd with the fetched `BlogEntry` document the corresponding `Author` is fetched via the AQL query defined in the directive.
The result will approximately look like this:
{
  "data" : {
    "blogEntry" : {
      "_key" : "1",
      "authorKey" : "2",
      "author" : {
        "name" : "Author Name"
      }
    }
  }
}
As a conclusion of this short demo, we can claim that with the usage of GraphQLs IDL, it is possible to reduce effort on the users' side to query ArangoDB with GraphQL. For simple GraphQL queries and IDLs it's possible to automatically generate resolvers to fetch the necessary data.
The effort resulted in an npm package is called graphql-aql-generator.
ArangoDB Foxx example
Now let’s have a look at the same example, but with using ArangoDB javascript framework - Foxx. To do so, we have to follow the simple steps listed below:
- Open the ArangoDB web interface and navigate to `SERVICES`.
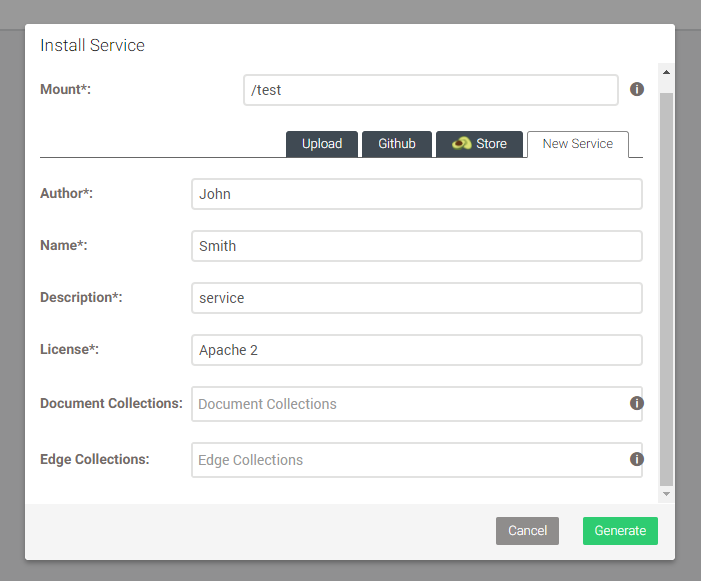
- Then click `Add Service`. Select `New Service` and fill out all fields with `*`.
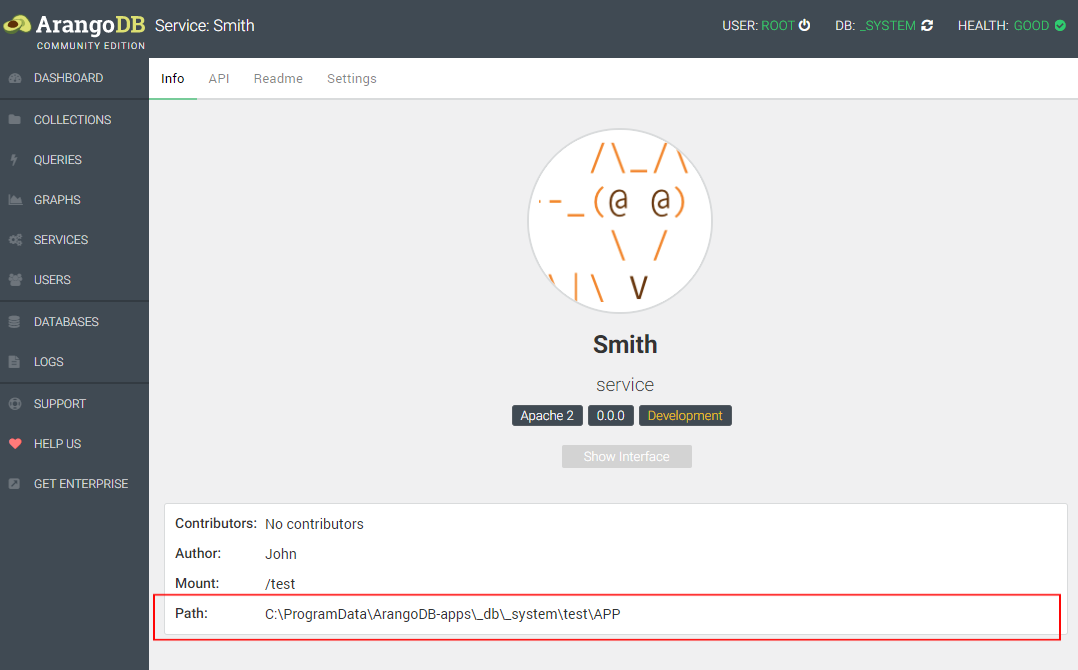
Important is the `Mount` field. I will use `/test`. Then Generate. - Click on the service to open its settings. Click `Settings` and then go to `Set Development` to enable the development mode.
- Then click `Info` and open the path at `Path:`.
Now we have to install the npm package:
npm install --save graphql-aql-generatorWe also need the collections `Author` and `BlogEntry`. And the following documents:
- `Author` collection:
{
  "_key":"2"
  "name": "Author Name"
}- `BlogEntry` collection:
{
  "_key":"1"
  "authorKey": "2"
}
Foxx has a built-in graphql router that we can use to serve GraphQL queries. We assemble a new route called `/graphql` that serves the incoming GraphQL queries. With `graphiql: true` we enable the GraphiQL explorer so we can test-drive our queries.
const createGraphQLRouter = require('@arangodb/foxx/graphql');
const generator = require('graphql-aql-generator');

const typeDefs = [`...`]

const schema = generator(typeDefs);

router.use('/graphql', createGraphQLRouter({
schema: schema,
graphiql: true,
graphql: require('graphql-sync')
}));
Open `127.0.0.1:8529/test/graphql` and the GraphiQL explorer is loaded so we can execute a query to fetch a `BlogEntry` with an `Author`.
{
  blogEntry(_key: "1") {
    _key
    authorKey
    author {
	  name
	}
  }
}
```
The result is:

```
{
  "data": {
    "blogEntry": {
	  "_key": "1",
	  "authorKey": "2",
	  "author": {
	    "name": "Author Name"
	  }
    }
  }
}
For the sake of completeness, here is the full Foxx example that works by copy & paste. Do not forget to
`npm install graphql-aql-generator` and create the collections and documents.
// main.js code
'use strict';

const createRouter = require('@arangodb/foxx/router');
const router = createRouter();
module.context.use(router);

const createGraphQLRouter = require('@arangodb/foxx/graphql');
const generator = require('graphql-aql-generator');

const typeDefs = [`
type BlogEntry {
_key: String!
authorKey: String!

author: Author @aql(exec: "FOR author in Author filter author._key == @current.authorKey return author")
}

type Author {
_key: String!
name: String
}

type Query {
blogEntry(_key: String!): BlogEntry
}
`]

const schema = generator(typeDefs);

router.use('/graphql', createGraphQLRouter({
schema: schema,
graphiql: true,
graphql: require('graphql-sync')
}));
Would be great to hear your thoughts, feedback, questions, and comments in our Slack Community channel or via a contact us form.
ArangoDB | PyArango Performance Analysis – Transaction Inspection
Following the previous blog post on performance analysis with pyArango, where we had a look at graphing using statsd for simple queries, we will now dig deeper into inspecting transactions. At first, we split the initialization code and the test code.
Initialisation code
We load the collection with simple documents. We create an index on one of the two attributes: Read more
Get the latest tutorials,
blog posts and news: